Over the last several months, as part of the Gatsby Concierge program, we’ve been working with a number of teams to improve the performance of their website. A lot of developers wonder why their app bundles grow so large. They can see that it’s big but they can’t figure out why. One common reason we’ve seen is the Gatsby’s code-splitting works with global state management libraries like Redux. This blog post walks through why that is and an approach you can use to maintain the flexible state management Redux offers without sacrificing Gatsby’s great performance.
Gatsby and Redux are both excellent tools for front-end developers, but when using them together, there are a few patterns you should be aware of that can have an impact on your site’s performance.
In general, Gatsby is un-opinionated about Redux or any other state management libraries and patterns. It, and other global state management tools are excellent, and if you feel your project would benefit from it, that’s up to you! Gatsby even uses Redux in its core. However, when used on the front-end with Gatsby and its automated code-splitting, there can be some unintended consequences in the resulting Javascript bundles. Let’s look at how Redux is normally added and how that is affected by Gatsby’s code-splitting and bundling. Then we will examine two patterns for using Gatsby + Redux without bloating our Javascript bundles.
The Common Pattern
The recommended pattern for adding Redux to a Gatsby project comes straight from the Gatsby docs:
- Wrap the root element in your Gatsby markup once using wrapRootElement, an API supporting both Gatsby’s server rendering and browser JavaScript processes.
- Create a custom Redux store with reducers and initial state, providing your own state management functionality outside of Gatsby.
In practice, that looks like this:
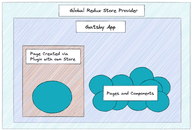
Now, your entire Gatsby app has access to your entire Redux store. That’s great! But, there is a problem. Gatsby now thinks that anything that your store touches needs to be in full app level scope. In other words, any Javascript that finds its way into your store will be loaded on every app page, no matter what. To further understand what’s happening, let’s look at Gatsby’s code-splitting patterns.
Gatsby’s Code-Splitting Patterns
One of the best things about Gatsby is not having to worry about or configure your webpack, Babel or bundling configuration. This can be tricky and time consuming. So Gatsby handles that for you to give you a great developer experience, and your end user the fastest site possible. For a full breakdown of Gatsby’s code-splitting, check out this section of the docs. In general, though, this chart is a good primer on how the different bundles get created:
| Bundle | Description | Naming Scheme |
| App | entry point for site, Gatsby framework, app context | app-[hash].js |
| Webpack Runtime | Webpack code that coordinates bundle interaction | webpack-runtime-[hash].js |
| Framework | for React / React-DOM | framework-[hash].js |
| Commons | libraries used on every Gatsby page | commons-[hash].js |
| Component* | for each page component and the components it uses | component–[file-path]-[hash].js |
| Shared* | libraries used by more than one page | [hash].js |
| Styles | CSS modules | styles-[hash].js |
| Library* | libraries larger than 160 Kb | [hash].js |
| Dynamic Imports* | JS imported using `import()` syntax | [bundle #]-[hash].js |
Source: https://github.com/gatsbyjs/gatsby/blob/master/packages/gatsby/src/utils/webpack.config.js
* There can be multiple bundles of this kind
Another thing to notice is that for several bundles, one of the determinants is whether something is used on more than one page. In general, code that is used on multiple pages is going to end up in a bundle like shared or commons, that is loaded on multiple pages.
The bundle we want to focus on is the app bundle. Notice that one of its components is ‘app context’. App context is anything provided across every page. So by wrapping our Gatsby app in the Redux store provider we are telling Gatsby that all Javascript related to that provider belongs in app.js.
It is also important to note that all of these issues would exist not just with Redux, but any global state management tool that uses this pattern, including React Context. We definitely aren’t picking on Redux. In our case with Redux, let’s look at how this can lead to unintentionally bloating your bundles with lots of code that is not used on every page.
Keep Your Bundles Under Control
Now that we see that Gatsby is going to take any global app context, bundle it and load it on every page, let’s go back to our initial example.
Now, let’s imagine some example reducers that could be getting passed in to the Provider here via the store. Our problematic reducer looks like this:
While there is nothing inherently wrong with this reducer on its own (despite its expensive dependencies), based on what we know about Gatsby code-splitting, we should now expect all of the JS to end up in the app bundle, and loaded on every page. Let’s look at two strategies for when this reducer is either:
- Only used on one page (location-based)
- Only used after a certain user interaction (interaction-based)
Adding a Location-Based Reducer
The code for this example can be found here.
Let’s imagine an e-commerce scenario, and that our expensive reducer above is for adding an item to the cart. In our app, the ‘add to cart’ button is on the `product/{product_id}` page, so we don’t want or need that reducer on our index page or anywhere else.
Adjusting for this location-based loading of the reducer means we keep the same pattern of wrapping the Provider, but now, we need to move the Provider from gatsby-ssr and gatsby-browser, and just wrap the root of the template or page using that slice of the store. As a result, the expensive reducer is removed from the app level and only gets bundled in the Javascript for the page created by this plugin. The state management for that Provider is limited now to that page and cannot be shared to another page.
In the template file, we create a wrapper component that uses the Provider, like so:
Now the BlogPost has full access to the Provider, while other pages do not.
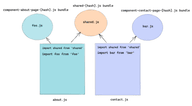
If you have an expensive reducer in your store that is only needed on one page, remove that reducer from the root Provider and move it to its own Provider wrapped specifically around the page that uses it. This prevents this expensive reducer from impacting pages where it is not used. The resulting bundles would look something like this:
This pattern is a very clean way to handle this, but often you may not be able to isolate an expensive part of your store to one page, because it needs to be on multiple or all pages for the app to work properly. In these cases, you will need to use an interaction-based solution.
Adding an Interaction-Based Reducer
The code for this example can be found here.
This pattern is very powerful, but steps out of Gatsby’s code-splitting almost entirely to dynamically load a slice of the store. While the previous pattern is meant to only load a reducer and its dependencies when a certain page loads, this pattern is to load the reducer when the user interacts with the site. We have the same expensive reducer as we did in the previous example. The pattern used here is from this excellent post by Nicholas Gallagher. The code for this example can be found in this repo if you’d like to follow along.
The most important bit of code we are adding here is a reducer registry. This will allow us to add reducers to the registry when a user does a certain action, for instance, clicking on a button. We maintain our initial pattern of wrapping the app in gatsby-browser and gatsby-ssr, but we don’t add the expensive reducers to the store yet.
Our store, which previously was static, will now dynamically load reducers from the registry, while still giving you the ability to have some static reducers, especially those that do not impact bundle size very much. In this example darkMode is a simple reducer that is still statically added to the store.
The ReducerRegistry file will look like this:
The final part of this pattern is actually registering a reducer in our React code. Note that the button here is using the connect pattern from react-redux to map the component’s props to state.
Let’s look at our button where we want to load the reducer lazily.
Before any changes, the same button before looked like this:
Note we are statically importing the reducer and calling the dispatch directly from the store. Now, let’s only call the dispatch when it is brought in through the reducer.
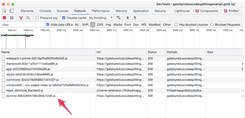
In this example, upon clicking the button, you would see the reducer and its dependencies in its own bundle come across the network tab.
From there, the store persists and functions as normal. This means users don’t have to pay the performance cost for expensive reducers that they may never use. It also gives you the flexibility to continue to use Gatsby’s code-splitting patterns for the bulk of your Javascript, but opt for this pattern if your app bundle begins to swell because of Redux and your reducers’ dependencies.
Happy Building!
Now that you know these two patterns, here are a couple of guiding questions to ask as you work with global state in Gatsby:
Do I need global state management (Redux, Context, etc.)? Try reducing the scope to:
- Local state
- Browser storage
Where do I need global state management?
- Location based code-splitting to limit slices to only the page needed.
When do I need global state management?
- Interaction based code-splitting to only load a reducer and its dependencies when a user does a certain interaction.
Thanks for taking the time to read this today! If you still have questions or are interested in getting personalized help to pinpoint performance problems on your site, take advantage of Gatsby Concierge which offers specialized options to supercharge your website performance.


